Using PowerPoint as a base presentation app, you can create different kinds of PowerPoint presentation samples. To create a sample presentation in PowerPoint, you can either start from scratch or use a base template.
Templates make it easy to create elegant PowerPoint presentations with basic knowledge of PowerPoint. Intermediate and advanced users can start from scratch using a blank presentation, and working with the slide master.
To create a presentation in PowerPoint, you will:
- Start a PowerPoint presentation application
- Insert slides based on suitable layouts depending on your needs
- Add contents to slides and apply themes
- Customize slide master(s) and layout masters as the need may be.
- Apply animations and transition effects to the presentation.
- Save the presentation
We have discussed some of the above items in our previous tutorials and will discuss others later. In this tutorial, we shall be discussing how to create elegant PowerPoint presentation samples.
The PowerPoint presentation examples discussed here will help you to create any type of presentation. If you want to base your presentation on an existing template, see how to use templates in PowerPoint presentations.
Create PowerPoint Presentation Samples
In this tutorial we shall be creating three (3) sample presentations:
- PowerPoint presentation sample for photo slideshow
- PowerPoint presentation sample for project reports or proposals
- PowerPoint presentation sample for advert placement
Create a presentation for a photo slideshow
A slide show is a presentation that automatically starts and ends on its own depending on how you customize it. Presentation slideshows may be in the form of:
- A movie or photo album
- A tutorial or class lesson
- A product advert, etc.
Such slideshows are usually packed in a CD/ DVD or uploaded on the internet to share with the audience.
Other sophisticated slideshow apps can be used to create photo slideshows. However, there may be a need for you to use PowerPoint; this is why you should have it as an alternative.
Some of the examples of when you may need PowerPoint to create a slideshow include:
- To showcase the products and services of an establishment in the reception or central point for customers to see
- Displaying the projects completed by a firm within a specified period for clients to see
- Displaying the brand identity, vision, mission, objectives, and values of an organization
- Display the pictures of a friend on a projected screen during a birthday party, wedding anniversary, etc for the guests.
A PowerPoint photo album is a presentation that you can create to display your personal or business photographs. How do you achieve this in PowerPoint? Follow these steps:
- Start a PowerPoint presentation application.
- On the Insert tab, under the Images group, click the arrow under Photo Album, and then select New Photo Album. The Photo Album dialog box appears.
- In the Photo Album dialog box, under Insert picture from, click File/Disk.
- In the Insert New Pictures dialog box, locate the folder that contains the picture for the album.
- Select all the pictures you want to include in the album slideshow. You can highlight as many pictures as you want by holding down the Shift or Ctrl key.
- Click the Insert button to insert the pictures in the Photo Album dialog box.
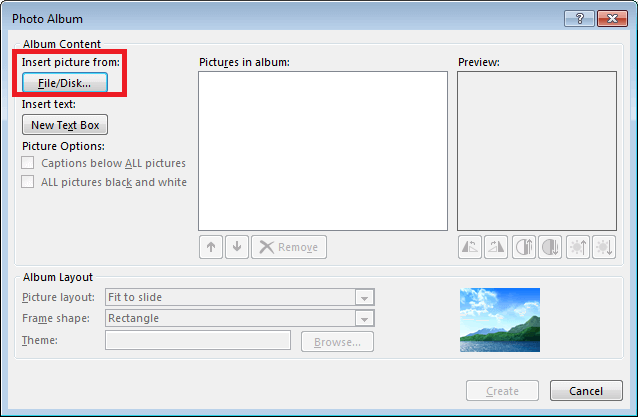
- To preview a picture in the album, under Pictures in album, click the file name of the picture that you want to preview. The selected picture will display in the Preview window.
- Use the arrow buttons to adjust the picture order in the album. Select the picture you want to adjust and click the up or down arrow button.
- Use the remove button to remove a picture from the album. Select the picture you want to remove and click on the remove button.
- Under Album Layout, select the Picture layoutdropdownarrow and choose an option. Depending on the option selected, you can select a Frame shape.
- To use a specific theme for the photo slideshow, select the Browse button under Theme. From the Choose Theme dialog box, select a theme of your choice.
- When you are done, click on the Create button to create your photo slideshow.
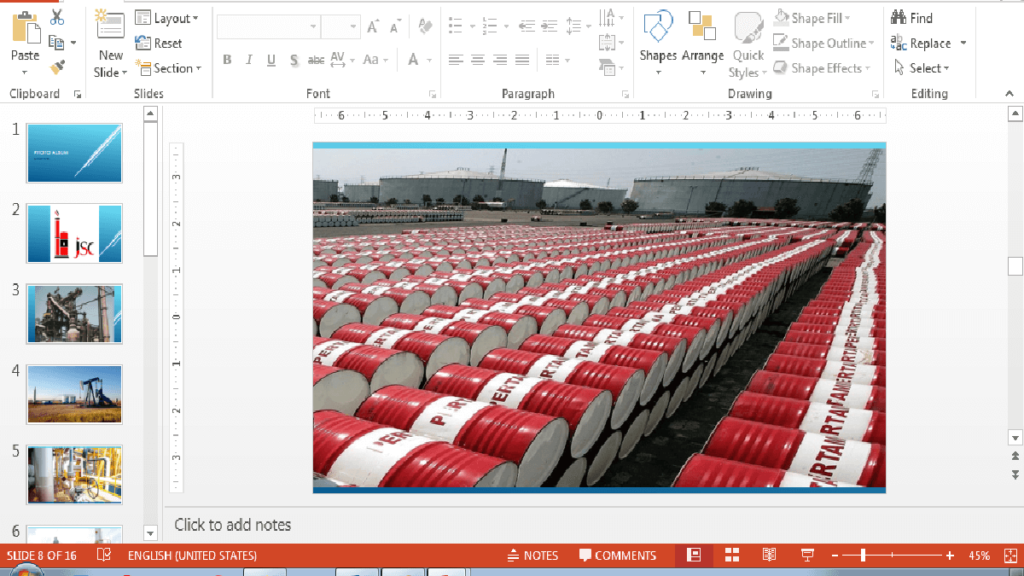
You have created your first slideshow, but you would have to apply animation and transition effects. You can also add sound to your presentation. The photo album should look like this:
Add a caption to your pictures
After you have created your album, do the following:
- On the Insert tab, under the Images group, click the arrow under Photo Album, and then select Edit Photo Album. The Edit Photo Album dialog window appears.
- In the Edit Photo Album dialog box, under Picture layout, select the other options except Fit slide.
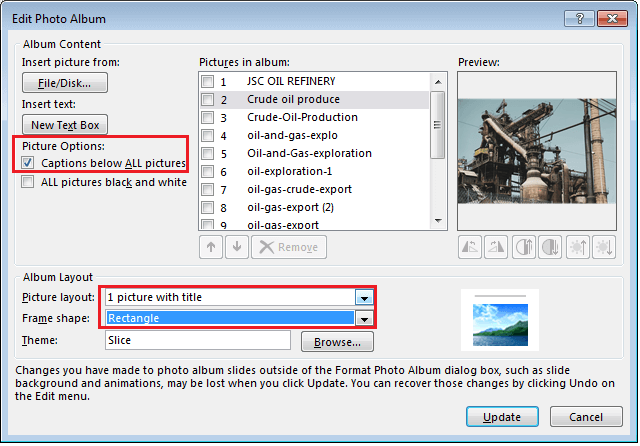
- Under Picture Options, select the Captions below ALL pictures option button. If this check box is unavailable, you must first choose a compatible layout under the Picture layout list.
- When done, select the Update button. By default, PowerPoint uses the picture file name as a placeholder for the caption text.
- In Normal view, click each caption text placeholder and change them appropriately.
Alternatively, use textbox to add captions to your pictures at any suitable position on the slides.
Add transition effect to slides
This is the simplest way to add transition effect to your slides:
- On the presentation window, hold down the SHIFT key and select all the slides thumbnail
- Go to the Transition tab, under Transition to This Slide choose a transition of your choice.
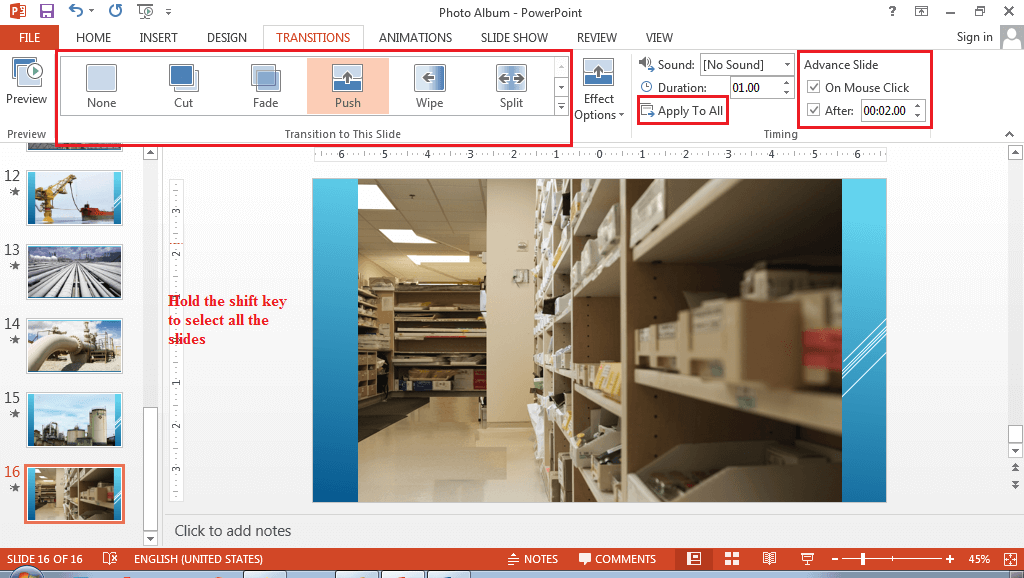
- Under Timing group, in the After text box. Enter the number of seconds you want, say, 5 seconds. The slides will advance after 5 seconds.
- Click Apply To All
You have applied uniform transition to your slides. To apply different transitions, select each slide thumbnail and choose a different transition effect. You can download the PowerPoint presentation sample for the photo album here.
Create a Presentation sample for reports and proposals
It is always important to have in mind the basic principles of a presentation when creating one. Among the different types of presentations, reporting is mostly used in organizations and education institutions.
When you want to create a presentation for marketing, sales, progress, or business report, follow this procedure.
- Start a Microsoft PowerPoint presentation application. The PowerPoint Presentation window opens.
- Select a template, if you want to start with a template or choose a blank presentation.
- Setup the presentation screen size:
- On the Design tab, under Customize group, select Slide Size.
- From the dropdown menu, choose any of Standard (4:3), Widescreen (16:9), or Custom Slide Size…
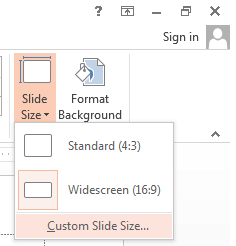
- If you select the Custom Slide Size…, a dialog box will appear.
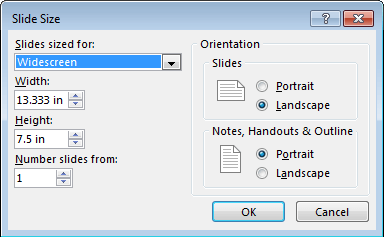
- On the dialog box, under Slides sized for: select a size suitable for your presentation.
- Select your slide Orientation (Landscape or Portrait). The landscape is usually the default.
- When done, click on the OK.
Add theme and content to slides
- Select a theme or customize a slide master
- On the Design tab, choose a theme of your choice or customize a suitable background for your presentation.
- On the View tab, select Slide Master and customize it appropriately.
- Add content to slides
- Choose a Title slide layout for the first slide. Depending on what you are reporting on, you can introduce the title of the report or introduce the business.
- If you introduced the business, the second slide should introduce the topic.
- On the third slide, state the summary or objective of the presentation. You can choose a bullet summary, but an image or chart summary would be more elegant.
- Insert more slides to elaborate on the objective(s) of the report, findings, results, and prospects.
- Mix points with images, charts, and videos where appropriate to ensure the audience’s attention is captured.
- Ensure that necessary points are on the slides rather than a detailed explanation.
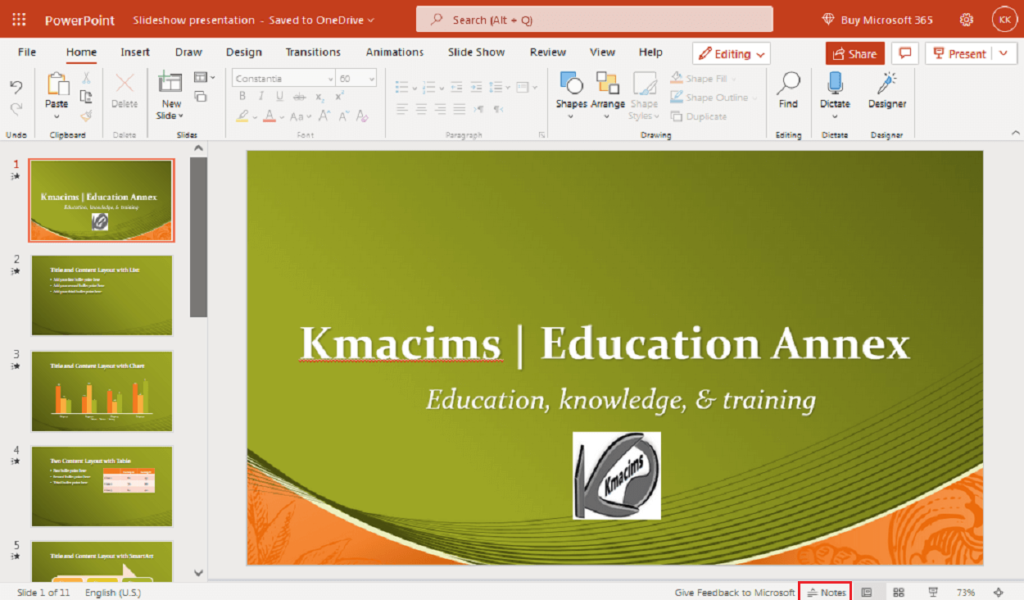
- To add notes to your presentation, click on the Notes button on the status bar. The notes window opens below the main slide window. Add your notes in the space. Notes could be explanations of the highlights on your main slideshow or hints on what your audience would do, etc.
- Save the presentation.
How to add content to a slide
When you insert a slide in a presentation, it usually inherits the layout of the previous side. You can change the slide layout depending on the type of content you want.
Each slide layout comes with placeholder boxes that assist you to add content to the slide. For example, the text, picture, table, media, chart, etc. placeholders. When you click on a content icon, you will insert the selected content.
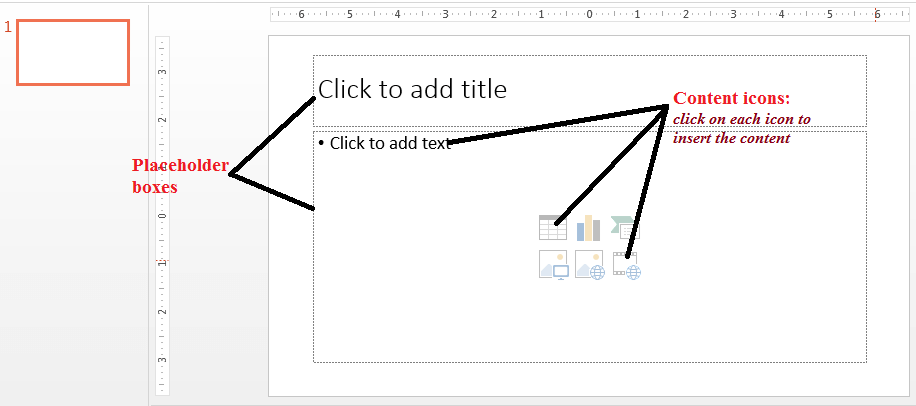
You can insert one content within a placeholder. [If you insert text, the icons for other content will disappear, etc.]. When adding different contents, do the following:
- To add a text:
- Click on the Click to add text in the placeholder box.
- Add the required text.
- Click the edge of the box to select the placeholder box
- Format the content of the box appropriately (change font type, size, color, etc.)
- To add a picture:
- Click on the Picture icon within the placeholder.
- Locate the picture you want to add to your slide and click Insert. You can insert more than one picture by holding the Shift or Ctrl button. The picture appears on the slide.
- Select the picture to format it: resize, position, reshape or add effects to it.
- Add a chart:
- Click the Insert Chart icon on the content placeholder.
- The Insert Chart dialog box appears, choose a chart from the list of options and click OK.
- An Excel spreadsheet appears with a default table. Enter the required data in the table to create the required chart.
- When done, close the Excel window, the chart created will appear on the slide.
- Add a table:
- Click the Insert Table icon on the content placeholder. The insert table dialog box appears
- On the dialog box, enter the number of columns and rows for the table and click OK.
- On the slide, enter the content of the rows and columns appropriately.
- Add a SmartArt:
- Click the Insert a SmartArt Graphic icon on the content placeholder.
- The Insert SmartArt graphics dialog box appears. Choose a graphic of your choice from the list of options and click OK
- On the slide, enter the content of the SmartArt graphic appropriately and customize as required.
- Add video file:
- Click on the Insert Video icon within the placeholder.
- Locate the video file you want to add to your slide and click Insert. The video appears on the slide.
- Select the video and format it appropriately.
Create a presentation sample for adverts
You can use transitions and animation effects to create and package clips for advert placement. The clips can be converted to a video file and be used for Facebook or YouTube adverts.
In the presentation example, we created a 14 seconds animated PowerPoint show with 3 slides. Download the PowerPoint presentation sample here.
To create a simple animated presentation, do the following.
- Open the Microsoft PowerPoint app and set up your slide appropriately.
- Choose a theme if you wish or select the appropriate background for your presentation.
- Choose an appropriate slide layout for the first slide and insert contents. In this example, we chose a blank content layout and added an oval shape.
- Add animation effects to the content of the first slide. In our example, we selected all the ovals and applied the Fly-In animation effect. We set up each oval to appear after the previous has appeared.
- Insert the second slide and insert appropriate contents in it. In our example, we created two lines with text boxes in between. We applied appropriate animation effects to the content.
- Insert as many slides as you want with their appropriate contents, also, apply animation effects as required,
- When done adding contents and applying animation effects, go to Slide Show and select Rehearse Timing. This will help to rehearse the time it will take for your presentation.
- When done, save your presentation as a PowerPoint Show or video file for sharing or use.
Printing PowerPoint Presentation Slides
When you create a presentation for reports, proposals, or business pitches, you may need to share a hard copy with the audience. This means that you will print the slides or the slides for your audience. To achieve this, do the following:
- From the File menu, select Print. The Print Preview and Print windows appear.
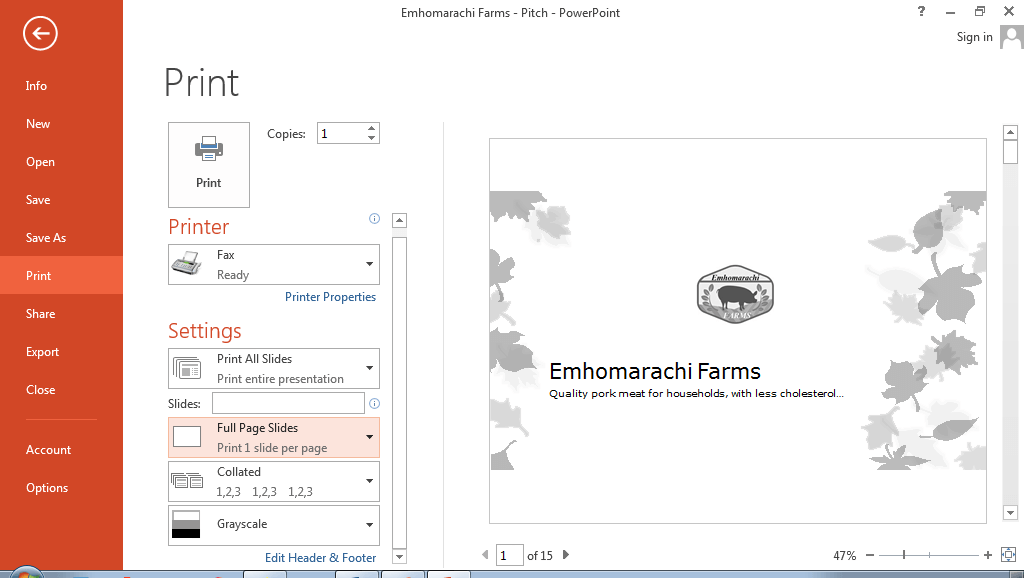
- On the print preview window, under Settings, select what to print. You can select Print all slides, Print Current slides, or Custom range.
- Click on Full Page Slides to select the Print Layout for your slides. You can choose one slide per page, two slides per page, etc. as shown below.
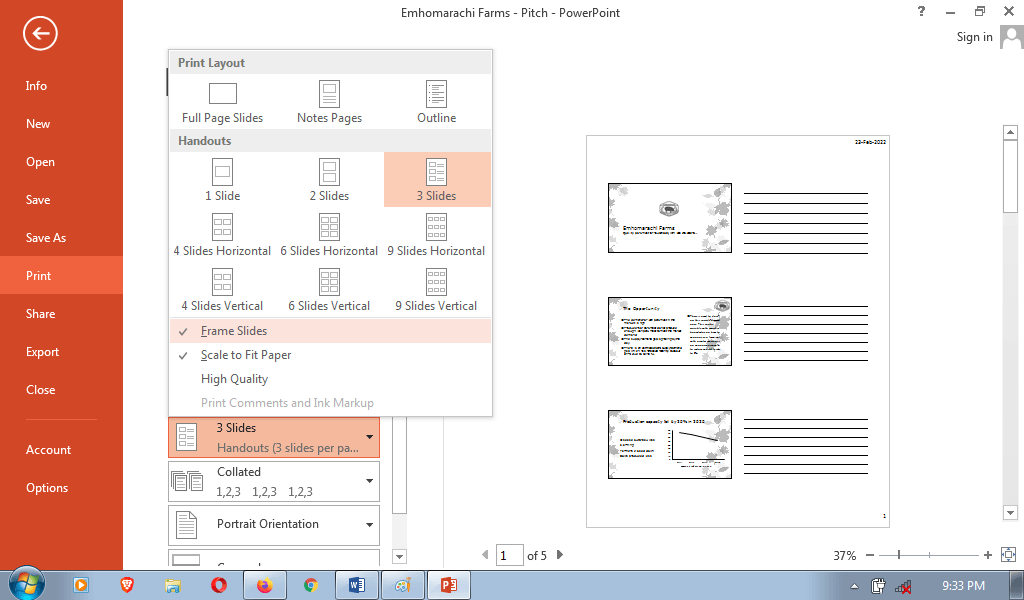
- Choose orientation, and print color: greyscale or color.
- If you are done, click the Print button to print.
Create and print notes pages
You can create note pages while you create or deliver your presentation. The notes can be useful for clarity or serve as a future reminder. You can as well print the notes for your audience.
To create note pages, select the Notes button on the taskbar to open the notes pane. Use the notes pane in Normal view to write notes about your slides as shown below.
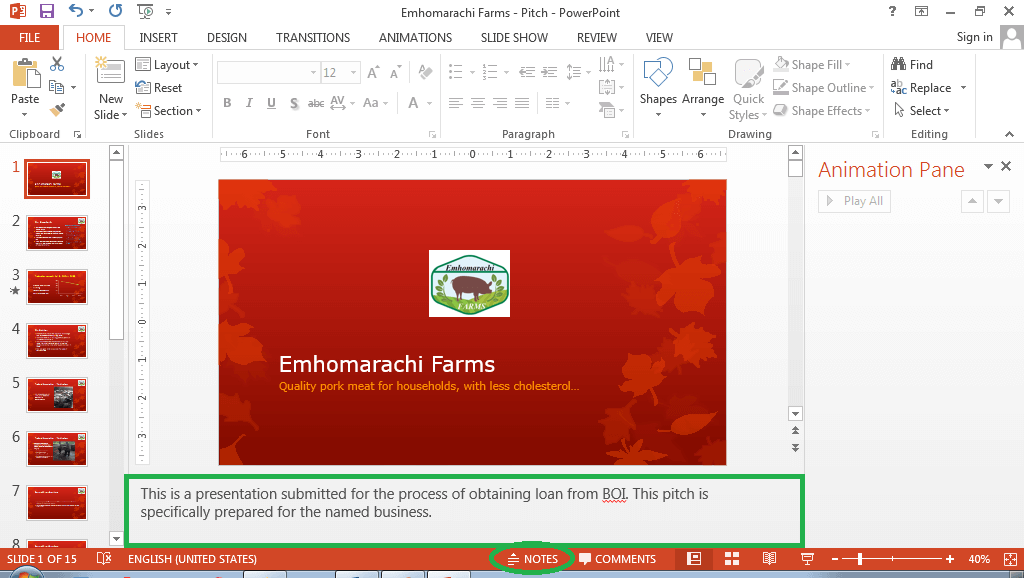
You can type and format your notes as you work in Normal view. To print the notes pages;
- From the File menu, select Print. The Print Preview and Print windows appear.
- On the print preview window, under Settings, select what to print. You can select Print all slides, Print Current slides, or Custom range.
- Click on Full Page Slides, from the popup list, select Notes Pages. The notes created will appear below each slide.
- Choose the page orientation and print color
- When done, click the Print button to print.
Print presentation in outline view
When you view your presentation in outline view, all graphics are removed to display only the text content. When you print your presentation in outline view, it will help to compress the points into a few pages.
If you want to print your presentation in outline view, do the following.
- From the File menu, select Print. The Print Preview and Print window appear.
- On the print preview window, under Settings, select what to print. You can select Print all slides, Print Current slides, or Custom range.
- Click on Full Page Slides, from the popup list, select Outline. The entire presentation will appear in outline.
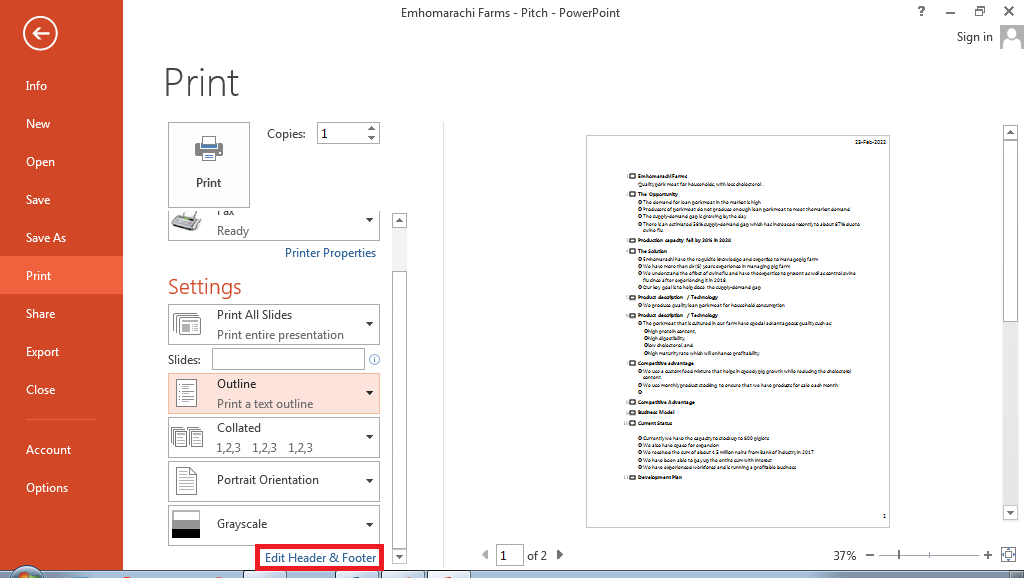
- Choose the page orientation and print color
- When done, click the Print button to print.
Add page numbers to slides
When printing your slides, you can add page numbers to the pages of the slides, notes pages, and outlines. By default, a page number is added to the notes pages and outline. To add page numbers to slides do the following:
- On the Print Preview and Print window, select the Edit Header and Footer link. A dialog box appears.
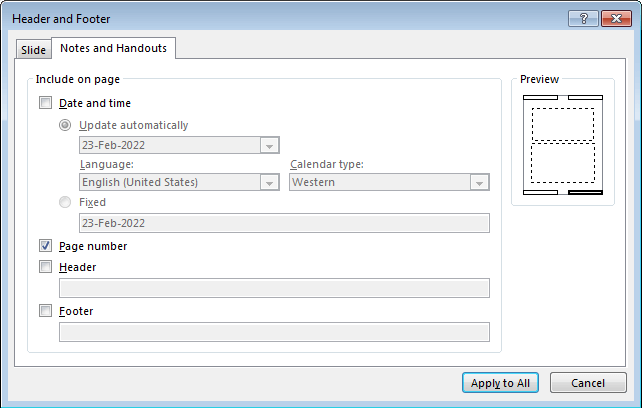
- Select the Slides or Notes and Handouts tab.
- To add a page number, select the Page number option button.
- To add date and time, select the date and time option button.
- To add a header or footer, select the Header or Footer option button. Then type in the text box, what should appear on the header or footer.
- When done, click the Apply to All button.
Conclusion
So far, you learned how to create presentations for photo albums, reports/proposals, and adverts. We also discussed how to print your presentations and distribute them to the audience.
For a packaged presentation such as an advert or tutorial, you will need to add animation effects and timings. In our future tutorial, we shall discuss how to apply animations and transition effects. Meanwhile, thank you for being part of this class, help us share with your colleagues.


