Adding effects to PowerPoint slides in a presentation is an invaluable skill for all PowerPoint users. It will help you create unique presentations that can run without human assistance.
When creating a presentation, the creator has the option to add effects or not. If you decide not to add effects, then you will need human assistance during the slideshow presentation. If you decide to add effects, then you can choose the kind of effect to add to your presentations.
There are different kinds of effects that you can add to PowerPoint slides in a presentation. They include:
- Animation effects
- Transition effects
- Sound and narration
- Video effects.
In this tutorial, we shall discuss how to add animation and transition effects to PowerPoint slides in a presentation.
- Basic Principles and Types of PowerPoint Presentations
- How to create PowerPoint Presentations for Beginners
- How to Use Templates and Slide Master in PowerPoint
Adding Effects to PowerPoint Slide: Animation Effect
The animation effect is used to provide emphasis or show information in phases in a presentation. Animation can be applied to text, graphics, or pictures in a presentation, per slide.
For example, you can make a text, graphic, or picture move, grow bigger, or disappear in a presentation. You can also specify the timing for each animation per content in a presentation.
Types of animation in PowerPoint
There are four (4) major types of animation in PowerPoint. They include:
- Entrance animations
- Emphasis animations
- Exit animations, and
- Motion animations
Let’s briefly discuss each of these animations.
The entrance animation effects
The entrance animation effect is used to make an object appear in a slideshow presentation. When you add an entrance animation on an object, the object will not be visible when the slideshow begins. However, the object will appear in the course of the slideshow based on timing specifications.
Thus, you will use entrance animations when you want an object in your presentation to appear during a slideshow. In this case, the object will not be visible when the slideshow begins. But after, (say, 0.05 seconds, etc), the object will appear in the slideshow window.
The entrance animation effects may be the same or different from those of other types. Some of the popular entrance animation effects include wipe, appear, fade, fly-in, float in, split, shape, etc.
The emphasis animation effects
The emphasis animations are used to emphasize an object in a presentation. They are usually used to draw the attention of the audience based on the relevance of the information conveyed.
For example, you may want your audience to take notice of an important instruction or object in your presentation. To do this, you can make the object blink or grow bigger in size. It can also be used to draw attention to a call for action in a presentation.
Some examples of the emphasis effects include blink, grow/shrink, spin, fill color, underline, etc.
The exit animation effects
The exit animations are used to make a selected object go out during a slideshow presentation. If you feel that the presence of an object in a presentation is not required, then make it exit.
For example, an object can appear and disappear after 5 seconds for another object to take the same position. You can choose from the list of exit animation effects like disappear, fade, fly out, zoom, random bars, wheel, etc.
The motion animation effects
The motion path is an important animation effect when creating self-running presentations. It causes an object to move or change its position. You can cause an object to move from left to right or any of the numerous motion paths available.
Some of the available motion paths include lines, arcs, turns, loops, shapes, etc. You can also create a custom path.
To apply any of the animations, you will need to choose an effect from the types of animations. Meanwhile, you must be creative when applying animations to create an elegant slideshow.
How to add animation effect to PowerPoint slides in a presentation
Use the following steps to add animation in PowerPoint.
- Open PowerPoint presentation and add content to the slides.
- Select the shape, text, picture, or clipart that you want to add animation or select its placeholder.
- On the Animations tab, in the Animation group, select the animation effect you want. Take note of the types of animations and select an effect from any of the groups.
- To add entrance animation, select any of the effects under Entrance.
- To add emphasis animation, select any of the effects under Emphasis.
- To add exit animation, select any of the effects under Exit.
- To add motion animation, select any of the motion paths under Motion Paths.
- If the animation effect you want to apply is not in the list, then select any of:
- More Entrance Effects…
- More Emphasis Effects…
- More Exit Effects…
- More Motion Paths…
- If you selected More Entrance Effects…, a dialog box will appear.
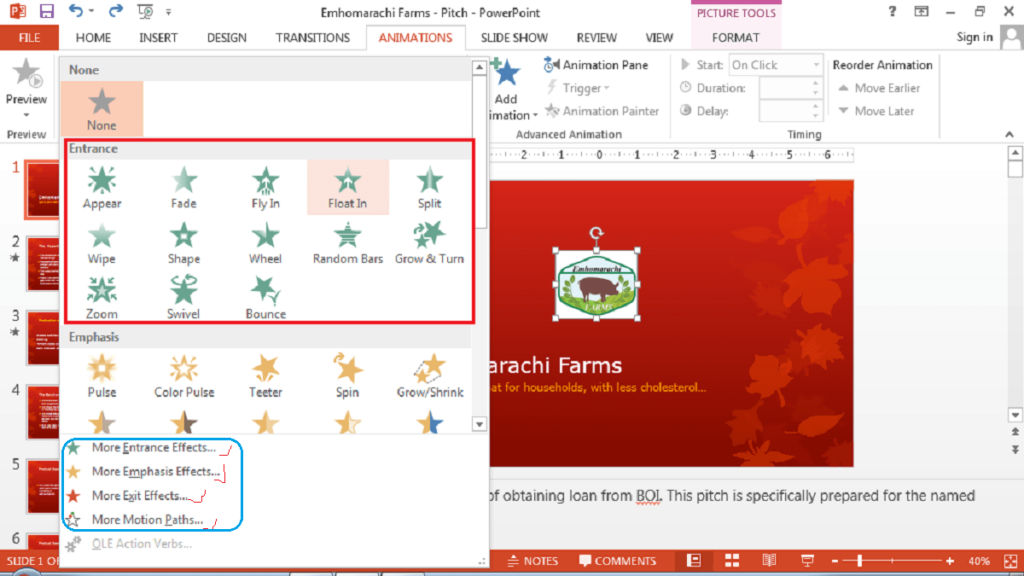
- On the dialog box, select the entrance effect suitable for the object you selected and click OK.
- Follow the above steps for each of the objects you want to apply animation on until done.
Add more than one animation effect to an object
You can add more than one type of animation to a selected object. For example, you can apply entrance, emphasis, motion, and exit animations to the same object. Use the following steps to add more than one animation.
- Select the object you want to add a second type of animation.
- On the Animations tab, under Advanced Animation, select Add Animation.
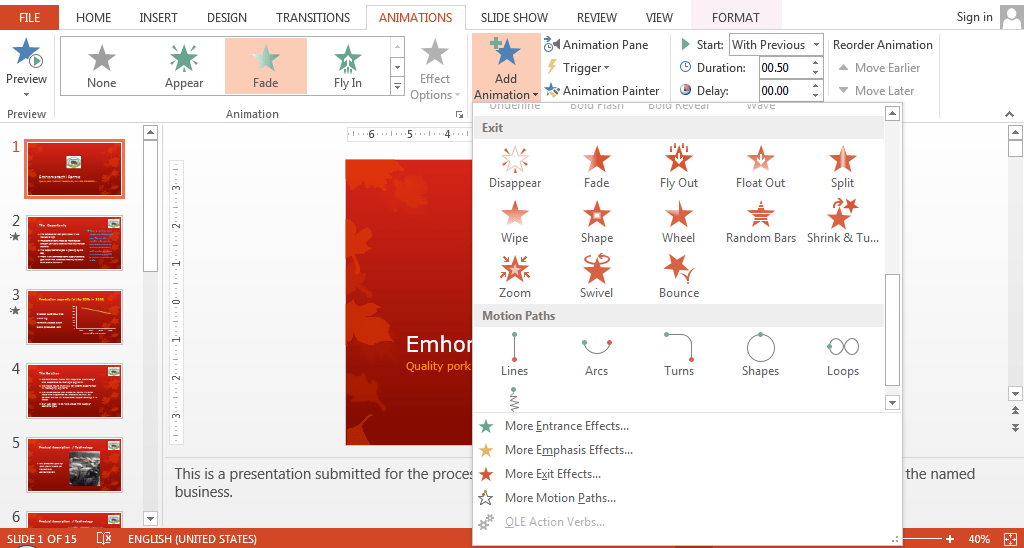
- From the dropdown list, select the type of animation effect to apply to the object as discussed above.
Customizing animation Effect
s
After you have added animation to an object, you can customize the timing and mode of animations.
Timing animation effects
You can time animation in two ways:
- By specifying the animation start time, and
- By specifying the duration of the animation.
The animation start time can be:
- On click – which means that you will click the mouse for an animation to start. This is the default start time for every animation added to an object in a presentation.
- With previous – which means that the selected animation will start at the same time as the previous animation. That is, animation B will start at the same time as animation A.
- After previous – which indicates that the selected animation will start after the previous animation has been completed.
- Delay – The delay tool is used to postpone the start time of a selected animation.
How to specify the animation start time
To specify the animation start time, use the following steps:
- Select the object or placeholder you want to add animation.
- Add the type and animation effect you want (see above)
- While the object or placeholder is still selected, do the following:
- On the Animations tab, under Timing, click the dropdown arrow next to Start.
- From the list that appears, select any of After Previous or With Previous.
- To delay the start time, enter the number of seconds you want to delay the animation in the Delay textbox.
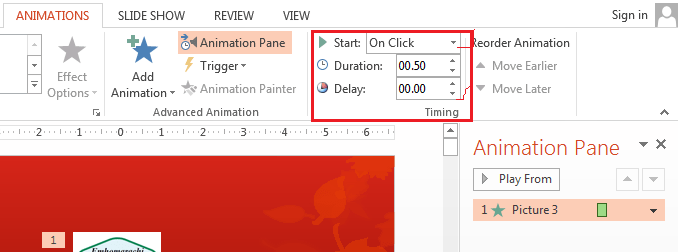
How to specify the speed of animations
The animation duration is controlled by the speed of the animation. The animation speed is controlled by time in seconds. The total duration of an animated object is the delay time plus the animation speed.
When specifying animation speed, there are predefined timing you can choose from depending on the selected animation effect. They include:
- Very fast – when selected, the applied animation will complete in 0.5 seconds.
- Fast – when selected, the applied animation will complete in 1 second.
- Medium – when selected, the applied animation will complete in 2 seconds.
- Slow – when selected, the applied animation will complete in 3 seconds.
- Very slow – when selected, the applied animation will complete in 5 seconds.
In addition to the above-predefined timing, you can specify a custom time in seconds. To specify the speed of animation, do the following:
- Ensure that the animated object or placeholder is selected.
- On the Animations tab, in the Advanced Animation group, select the Animation Pane button. The animation pane will appear on the right-hand side of the window.
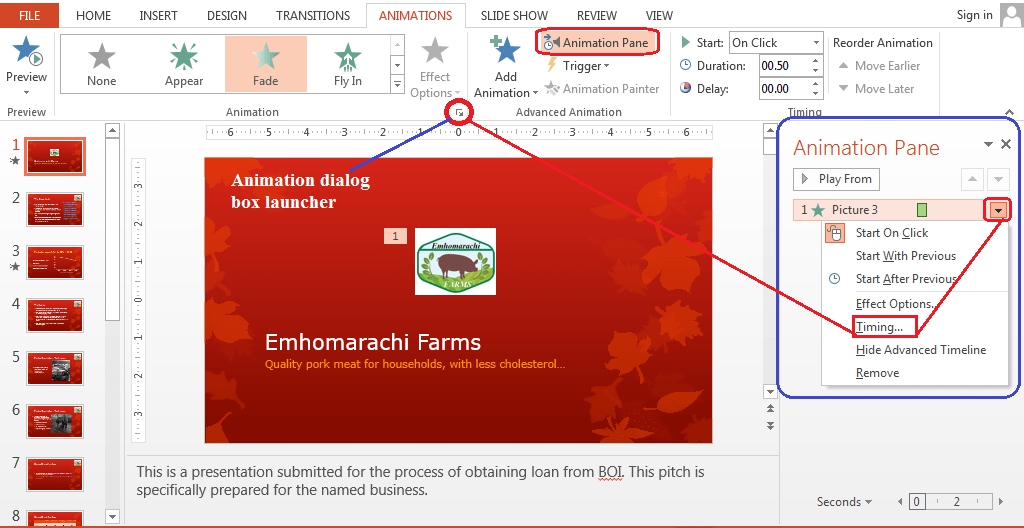
- Click on the dropdown arrow next to the selected animation effect and select Timing… from the popup menu. You can also click on the Animation dialog box launcher.
- The animation effect dialog box launcher will appear.
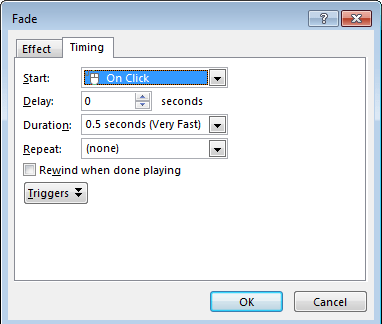
- On the dialog box that appears, you can specify:
- The start time of the animation using Start options.
- Delay of the animation effect using the Delay textbox
- Duration of animation effect using Duration options or enter custom time in seconds.
- Specify whether to repeat or not repeat the effect using the Repeat options. You can repeat an effect the number of times specified, until next click, or until end of slide.
- When you are done with the adjustments, click on the OK button to apply.
Note: The customization options available depend on the animation effect applied. When an object with an effect is selected, selecting another effect will change the previous effect to the current effect.
Preview an effect
When an animation effect is applied to an object, the effect will preview automatically. However, to preview all the animations on a slide in a presentation do the following”
- On the Animations Pane, deselect all the animation effects.
- Click on the Play All button. The entire animation will play orderly.
How to animate text in PowerPoint slides
When animating text in a presentation, there are a few things to consider.
- Animate all text at once
- Animate text by word or by letter
- Animate text by paragraphs
Let us look at each of them in detail.
Animate all text in a placeholder at once
A text in a placeholder can be in paragraphs or a word or line of text. Whichever form it takes, do the following to animate a text.
- Select the text placeholder in the slide
- Add your desired animation effect to the text object, e.g. Wipe effect.
- On the Animations tab, in the Animation group, click on Effect Options.
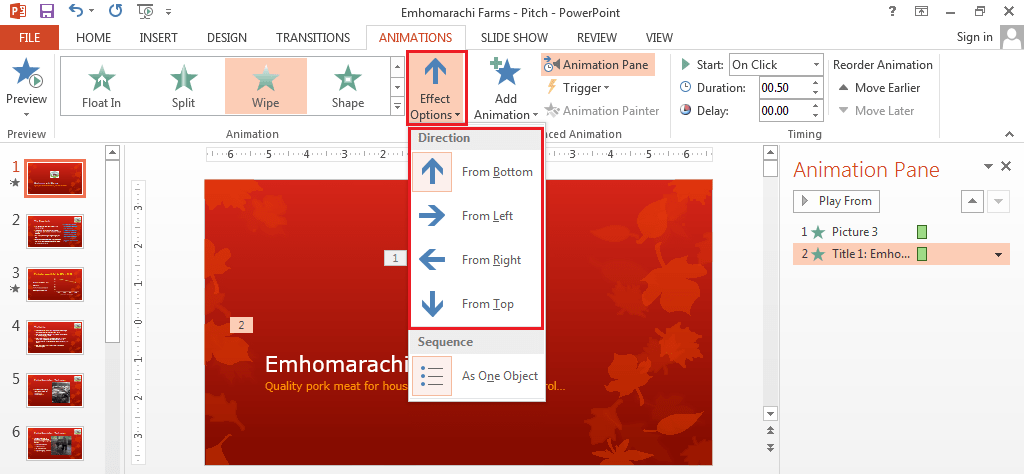
- From the dropdown options, select a direction of your choice. Note: The options available depend on the animation effect selected.
- To animate all text in the placeholder at once, do any of the following:
- From the Effect Options dropdown menu, under Sequence, select As One Object.
- Click the animation dialog box launcher. On the Effect tab, under Animate text, select All at once and click OK.
- Click the animation dialog box launcher. On the Text Animation tab, under Group text, select As One Object and click OK.
- Preview the animation. All the text in the placeholder will animate as one object.
Animate text by word or by letter
There are times you may prefer to animate text by word or letter. To achieve this, choose a suitable animation effect. For example, the Whip animation effect is suitable for letter animations while Fade can be used for word animations.
To apply word or letter animation to a text, use the following steps.
- Select the text placeholder in a slide of your presentation.
- Add your desired animation effect to the text object, e.g. Whip effect.
- On the Animations tab, in the Animation group, click on Effect Options. Note: Whip effect does not have effect options.
- To animate text by word, do the following:
- Click the animation dialog box launcher. On the Effect tab, under Animate text, select By word.
- Under % delay between words, enter the percentage it will take for each word to appear in sequence. 100% means the first word will appear before the next word in sequence, etc.
- Click OK to apply.
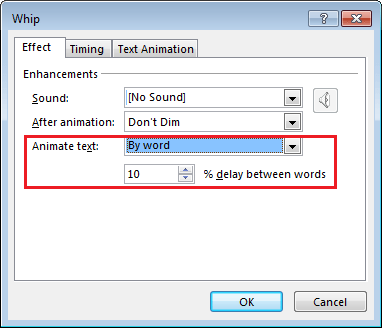
- To animate text by letter, do the following:
- Click the animation dialog box launcher. On the Effect tab, under Animate text, select By letter.
- Under % delay between letters, enter the percentage it will take for each letter to appear in sequence. 100% means the first letter will appear before the next letter in sequence, etc.
- Click OK to apply.
- Preview the animation by clicking on the Play From button on the Animation Pane. If need be, go back and make some adjustments.
Animate text in PowerPoint by paragraphs
When you have more than one paragraph of text in a placeholder, you can choose to animate them separately. By this, you can apply different animations to each paragraph. To achieve this, use the following steps:
- Select the text placeholder on the slide in your presentation.
- Add your desired animation effect to the text object, e.g. Fade effect.
- On the Animations tab, in the Animation group, click on Effect Options. Note: The fade effect does not have effect options.
- To animate text in the placeholder by paragraph, do any of the following:
- From the Effect Options dropdown menu, under Sequence, select By Paragraph.
- Click the animation dialog box launcher. On the Text Animation tab, under Group text, select By 1st Level Paragraphs and click OK.
- You can also specify the time it takes for each paragraph to animate in the Automatically after textbox.
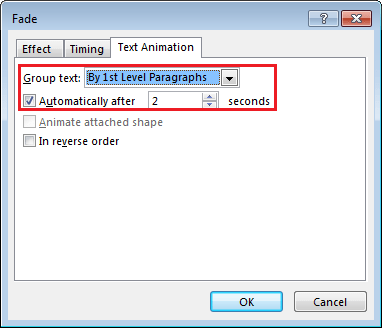
- Preview the animation by clicking on the Play From or Play All button on the Animation Pane.
Apply different animations to different paragraphs
- I assume that you applied the Fade entrance effect on the paragraph text above.
- On the Animation Pane, select the double arrow button to expand the contents.
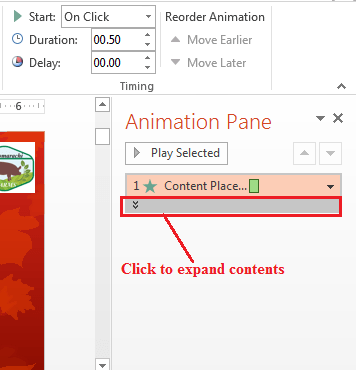
- Each paragraph in the placeholder will be displayed.
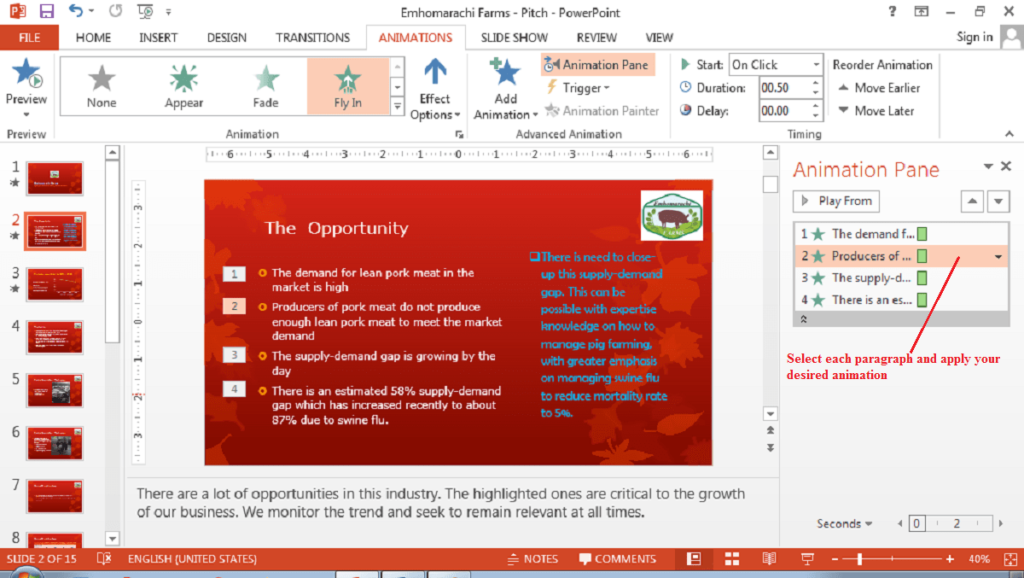
- Select a paragraph in the animation pane and apply your desired animation effect.
- You can add more than one animation to each paragraph. Also, you can select a paragraph and reorder the animation sequence.
Adding Effects to PowerPoint Slide: Transition Effect
The transition effect in PowerPoint is a visual effect that is used to change a view from one slide to another. It adds visual interest to a presentation thereby making it come alive to the audience.
There are three (3) types of transitions in PowerPoint. They are:
- Subtle
- Exciting, and
- Dynamic content
When adding slide transitions, you can choose an effect from any of the effects under the above categories.
What is transition in PowerPoint?
Transition in PowerPoint is a dynamic effect that occurs in the slideshow when moving from one slide to another. You can control the speed of each slide transition, and also add sound.
Add the same slide transition to all slides in a presentation
- Select the thumbnail you want to apply the transition effect.
- On the Transitions tab, in the Transition To This Slide group, select a transition effect from the list.
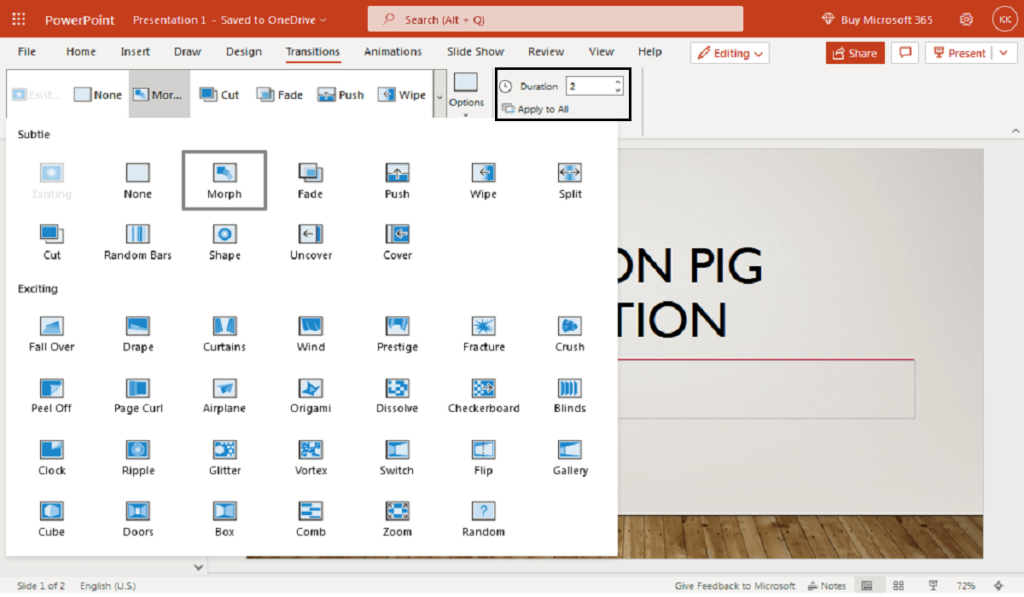
- The selected effect will immediately apply to the selected slides.
- Click Options next to the transitions effect and select an option from the dropdown list. Note: Options may not be available depending on the transition effect selected.
- To set the slide transition speed do the following:
- On the Transitions tab, in the Timing group, enter time in seconds in the Duration textbox.
- On the Transitions tab, in the Timing group, click the Apply To All button.
- The selected transition effect will be applied to all the slides in the presentation.
- Note: You can hold the SHIFT key and select all the slide thumbnails in the presentation. Then select a transition effect of your choice to apply the same transition to all the slides.
Specify slide transition mode
There are two ways to advance a slide, namely:
- Manually otherwise called On Mouse Click – This is usually used when delivering a presentation before the audience. You can also use On Mouse Click when a presenter wants the audience to be in control of the slideshow.
- Automatically that is by using timing – This is used when packaging and sharing a presentation. In this case, the audience will only view the slideshow.
To specify the mode of slide transition in your presentation, do the following:
- To use manual slide transition do the following:
- On the Transitions tab, in the Timing group, select the On Mouse Click option button under Advance Slide.
- To use automatic slide transition do the following:
- On the Transitions tab, in the Timing group, deselect the On Mouse Click option button under Advance Slide. This option button is usually selected by default.
- On the Transitions tab, in the Timing group, enter time in seconds in the After textbox.
Add different slide transitions to slides in a presentation
- Select a slide thumbnail in the slide thumbnails pane.
- On the Transitions tab, in the Transition To This Slide group, select the transition effect you want.
- Set the slide transition duration and mode as discussed above.
- Select the next slide thumbnail on the list and follow steps 1 – 3 above.
- Do the same for all the slides you want to apply a transition to in the presentation.
Add sound to slide transitions
- Select a slide in the slide thumbnails.
- On the Transitions tab, in the Timing group, click the arrow next to Sound.
- From the dropdown list, select a sound effect.
- To add a sound not found on the list, do the following: (Note: use this method to add a custom sound effect)
- From the dropdown list in (3) above, scroll and select Other Sound… The add sound dialog box appears.
- Search for the sound file you want to add to the transition and select it.
- Click the Open button to add the selected sound file.
- Repeat the above steps to add sound to each transition effect as you wish.
Conclusion
Adding effects to PowerPoint slides in a presentation seems to be a difficult task but it is worth learning. It helps you to create an elegant presentation that can run in your absence.
In this tutorial, you learned how to add animation and transition effects to a slide in a presentation. You also learned that the speed or duration of an animation affects the overall duration of a presentation.
Because this tutorial is tasking and requires continuous practice, we will welcome questions of all kinds. Use any channel suitable to ask your questions. Please, do not forget to share this tutorial with friends and colleagues if you find it useful. Thank you for staying with us till the end of this tutorial.


