Many times, you will not be present to deliver your presentations to your audience. When this is the case, you can add audio to PowerPoint slides while sharing your presentations.
Cases such as when working with a team from different branches of a company, delivering lectures to students online, etc. When such cases arise, adding voice and narrations to your presentations becomes inevitable.
Adding audio to a presentation is one of the ways to make your presentations come alive to your audience. Audio can be background music, voice-over a presentation, or a narration of your presentation.
In this tutorial, we shall learn how to add audio to PowerPoint slides in a presentation. This includes adding music, voice, narration, and video to PowerPoint presentations.
How to add audio to PowerPoint Slides
Audio can be a music file that plays across the slides or a voice added to a presentation. Before adding audio, you should have added content to the presentation to ascertain the duration of the presentation.
The length of the audio file should therefore be equal to the duration of the presentation. If both timings do not tally, then adjustments can be appropriately made.
To add audio to PowerPoint slides, do the following:
- Open a PowerPoint presentation window, if it is not already open. (See how to start PowerPoint)
- On the slide Thumbnail Pane, select the PowerPoint slide you want to add audio.
- On the Insert tab, under the Media group, click the arrow under Audio.
- From the dropdown menu that appears, select Audio on My PC.

- The Insert Audio dialog box appears. Browse to locate the audio file you want to add to your slide.
- Select the appropriate file and click on the Insert button. The selected audio will automatically appear on the slide.

- Repeat the above steps for each PowerPoint slide you want to add an audio file.
Customize audio playback in PowerPoint slides
How would you want the audio you added above to play in your PowerPoint slides? PowerPoint gives you two options to play an audio file in a presentation:
- On Click – This gives the viewer control to play or not to play the audio in the presentation.
- Automatically – This permits the audio to start playing without the viewer’s interaction. When the PowerPoint slide with the audio shows, the audio will play automatically depending on the setting.
To customize how to start audio in PowerPoint slides, do the following:
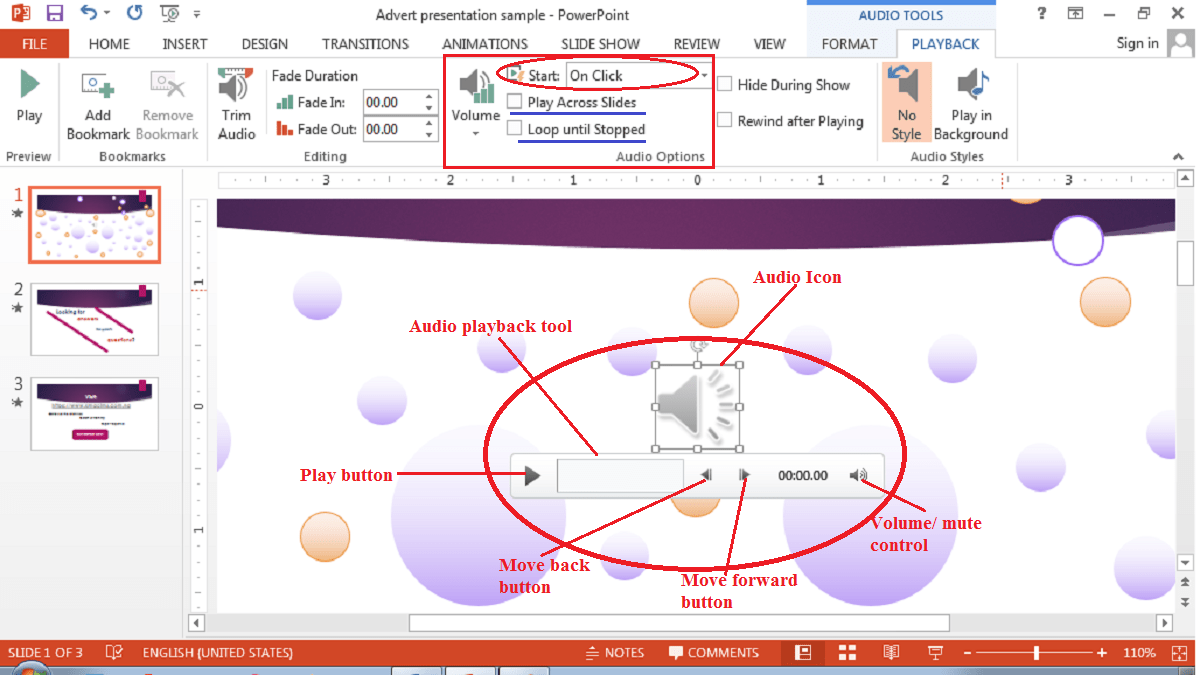
- After inserting your desired audio, the Audio icon is displayed on the slide. Select the audio icon (if not automatically selected)to display the audio playback tool.
- Use the audio playback tool to preview the audio you added. Click on the Play button to play the audio and use the Pause button to stop the audio.
- Go to the Playback tab, in the Audio Options (Note: audio icon must be selected).
- Under Start: click the dropdown arrow and select either On Click or Automatically. If you selected On Click, viewers will use the audio icon to play the audio. Automatically will play the audio as soon as the slide loads.
- To keep repeating the audio, select the Loop until Stopped option button.
Tip: If you are sharing a presentation using automatic slide transition, choose to play audio automatically.
How to add audio to PowerPoint for all slides
You just added audio to a PowerPoint slide above. You can limit the audio to play on one slide, across some slides, or throughout the entire presentation. To add audio to PowerPoint for all slides in a presentation, follow these steps.
- After inserting your desired audio, and while the Audio Icon is selected.
- Go to the Playback tab, in the Audio Options, and select the Play Across Slides option button. The inserted audio will play across all slides in the presentation.
Tip: If the audio length is shorter than the duration of the presentation, select Loop until Stopped.
Add audio to some slides in PowerPoint
You can also add audio to play across some slides in a presentation. For example, you can add audio and customize it to play across 3, 4, … slides only. To achieve this, do the following:
- Insert audio in the first slide of the next few slides the audio will play across. E.g. if audio will play across slides 3 – 5, insert the audio file in slide 3.
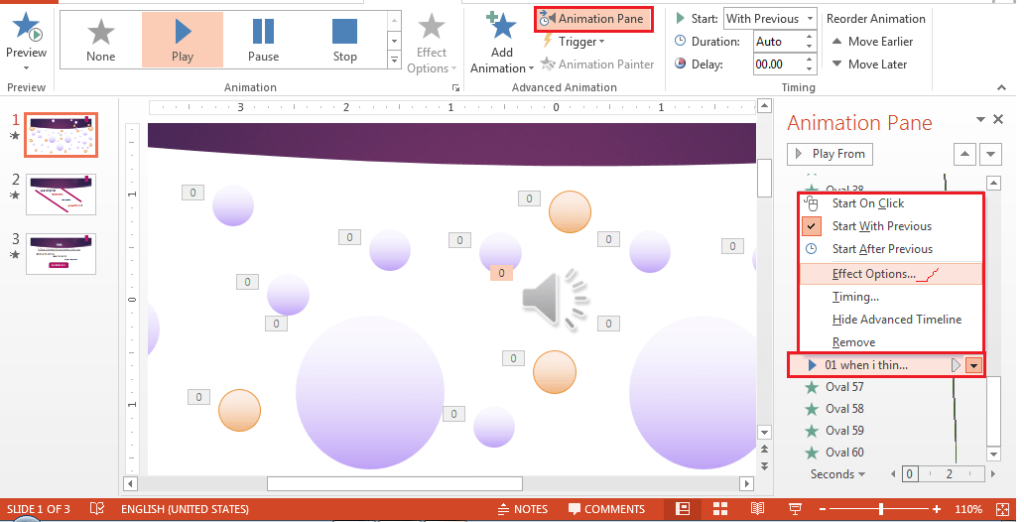
- On the Animations tab, under Advanced Animation, select the Animation Pane button.
- On the Animation Pane, locate and select the inserted audio and click the dropdown arrow.

- From the popup menu that appears, select Effect Options… The Play Audio dialog box will appear.

- On the Play Audio dialog box, do the following:
- Under Start playing, select where you want the audio to start. If you choose From time, specify the number of seconds into the audio.
- Under Stop playing, select when to stop playing the audio. To stop playing the audio after 3 slides, specify 3 in the After textbox.
- Click on the OK button when done. The inserted audio will play according to your specifications.
Hide the audio icon during the slideshow
When you insert an audio file in a slide, the audio icon will be displayed automatically on the slide. This icon can be used by the viewers to play and control the audio during the slideshow.
However, you can decide to hide the audio icon and make it invisible to viewers. By so doing, viewers will not have control, but the audio will play during the slideshow.
If you choose to hide the audio icon, then you will start the audio automatically. To hide the audio icon during a slideshow, do the following:
- Select the audio icon on the slide it was inserted.
- On the Playback tab, under the Audio Options group, select the Hide During Show check box.
Delete audio in a slide
If you think that the audio in a presentation is not required, you can delete it. To delete audio, do the following:
- Select the slide that has the audio you want to delete from the slide thumbnails.
- In Normal view, select the audio icon and press the DELETE key on the keyboard.
- Repeat steps 1 and 2 above for each audio in all the slides of your presentation.
How to add narration to PowerPoint
Narration or voice-over a presentation is an audio illustration of your presentation. When added to a presentation, your audience will watch and listen as if they are participating live.
Narration enhances sharing of web-based or self-running presentations. It can be used to archive a meeting so that absentees can review the presentation later.
As you record your voice, the amount of time spent on each slide will be automatically recorded. You can choose to save the slide timings at the end of the recording. To manually control slide transition, you can discard the recorded timings.
Slide timings are useful if you want the presentation to run automatically with your narration. You can turn the timings off when you don’t want the presentation to use them.
How to add voice to PowerPoint presentation
You can add voice to PowerPoint presentation in two ways:
- Adding audio voice to a presentation – This implies that you will record voice independently and add it to your presentation appropriately. The recorded voice can be trimmed to match the duration of the presentation. Tip: Do not use this method if you cannot control the flow of animations and the voice record.
- By recording audio narration – This method is easier for beginners who want to add voice to PowerPoint presentations. The user will discuss his/her presentation as if he/she is making a live presentation. The Record Slide Show command will assist you in achieving this.
The first method allows you to record the subject of your presentation using a sound recorder or any other software. The audio file can then be imported into your presentation.
You might decide to use this method if you want a clearer sound which your system may not offer. Also, when you want to use someone else’s voice rather than yours during the presentation.
To add the recorded voice, follow the steps on adding audio to slides. Remember that this method requires professionalism to ensure that the content of the presentation and audio voice is in agreement.
The second method is easier to achieve. Follow the steps below to record voice to PowerPoint presentations.
Record narration to PowerPoint presentations
Ensure that you have finished adding content to your presentations before you add narration. Also, add the necessary animations and transitions. Everything about the content of the presentation should have been completed.
- In the normal view, select the slide that you want to record narration on from the slide thumbnails.
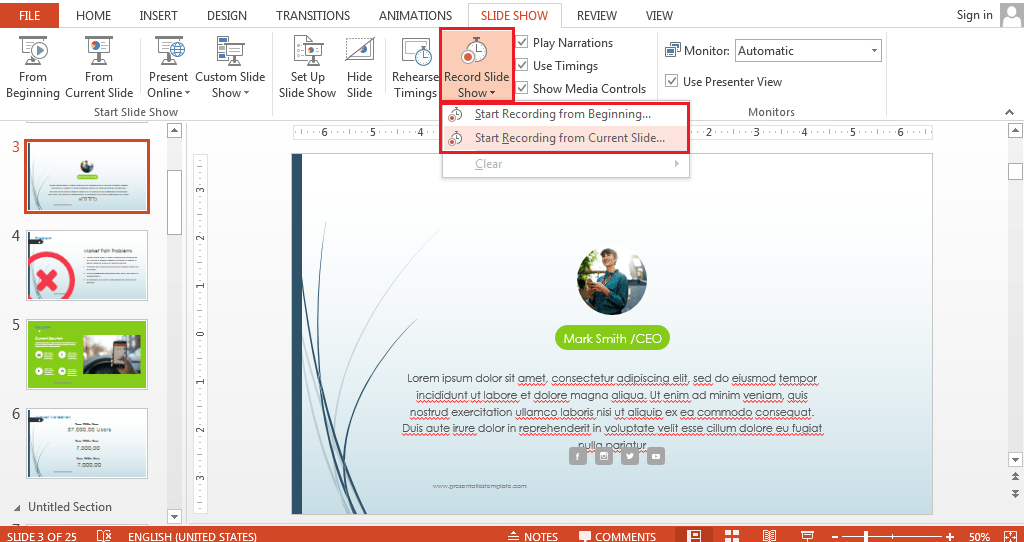
- On the Slide Show tab, under the Set Up group, select Record Slide Show.

- From the dropdown menu, select any of Start Recording from Beginning… or Start Recording from Current Slide…
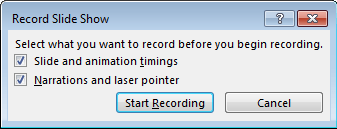
- The Record Slide show dialog box appears.

- To record slide animation timings, select the check box. To record narrations and laser pointer, select the check box. When done, select the Start Recording button.
- The slide show window appears. You should have connected and tested your microphone to start recording narration.

- During the slide show, use the tools labeled above to control your illustration and presentation timings.
- When you pause the recording, a dialog box will appear. Click on Resume Recording to resume recording your narration.
- Record the required voice of the presentation, and continue from slide to slide till the end of the presentation.
- If you selected to record timings, the recorded timings will be saved slide by slide. To see the timing for each slide, view the presentation in slide sorter view. On the View tab under Presentation Views, select Slide Sorter.

- When done, save your presentation.
Preview a narration
- On the Normal view, select one of the slides and click the audio icon. (Note: narration audio icon is placed at the down right side of the slide.)
- Use the audio tools to preview the voice you added to each slide.
- To edit the narration by adding fade in / fade out or trim the voice do the following:
- On the Playback tab, under Editing add fade in / fade out timings
- Click Trim and adjust the starting or remove part of the voice audio.
- When done, save your presentation.
Turn the slide timings off
Turning off the slide timings does not delete them. You can turn the timings back on at any time without having to recreate them. However, when the slide timings are turned off, your slides will not automatically advance during the slide show.
- On the Slide Show tab, in the Set Up group, deselect the Use Timings option button.
Turn off the narration
- On the Slide Show tab, in the Set Up group, deselect the Play Narrations option button.
Delete the narration and timings
You can delete a narration or timing that you do not need in a presentation. Use the Clear command in the Record Slide Show dropdown menu to clear narrations and timings. To delete narration or timings, do the following:
- Open the presentation you want to delete the narration or timing. If you want to delete narration or timing on a particular slide. Select the slide.
- On the Slide Show tab, under Set Up, select Record Slide Show.

- From the dropdown menu that appears, point to Clear and do any of the following:
- To delete timing on the selected slide, select Clear Timing on Current slide
- To delete all timings in the presentation, select Clear Timings on All slides
- To delete narration on the selected slide, do any of the following:
- Select Clear Narration on Current Slide
- Select the voice audio icon and press DELETE on the keyboard.
- To delete all narrations on the presentation, select Clear Narrations on All Slides
- When done, save your presentation.
Add a Video to a PowerPoint Presentation
You can add a video to support your presentation. To add a video, do the following:
- On the PowerPoint window, select the slide you want to add a video.
- On the Insert tab, under Media group, select Video.
- From the dropdown menu, select Video on My Pc. A dialog box appears.
- Locate the video file you want to add to your presentation and click Insert. The video is added automatically.
- Use the video tools to preview the video you just added and save your presentation.
- To play the video in full screen, do the following:
- Select the video you added
- On the Playback tab, under Video Options, select the Play Full Screen option button.
Conclusion
If you started from the beginning of this tutorial, you should have learned how to add audio to PowerPoint slides. You also learned how to add voice or narration to PowerPoint presentations. You can only improve on your skills if you practice. So keep practicing and pose any question you wish. If you like this post, kindly share it with friends and colleagues.


